Try Brow and Lash Styles on Your Own Face — Before You Book

You can scroll through a hundred before-and-after photos of brow lamination or volume lashes and still have no idea how either would look on you. Other people's faces are other people's faces. Their bone structure, eye shape, brow density, and lash line aren't yours.
That's why we built the AI Visualizer — a free tool that generates a photorealistic preview of how a specific brow or lash style would look on your actual face. Upload a selfie, pick a style, and see the result in under a minute.
The Quick Version
- Upload a photo. Pick a style. See it on your face. The tool generates a unique preview based on your features — not a filter, not a sticker.
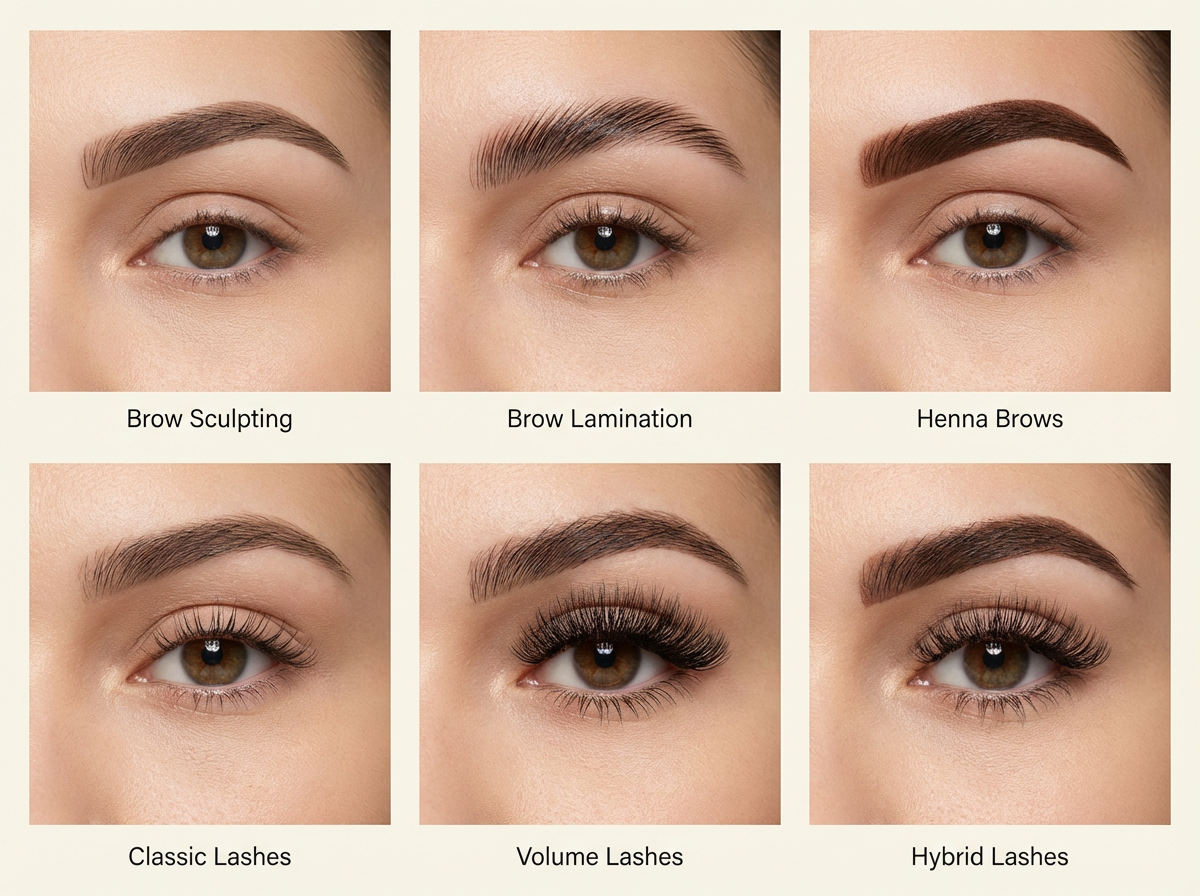
- Six styles available: Brow Sculpting, Brow Lamination, Henna Brows, Classic Lashes, Volume Lashes, and Hybrid Lashes.
- The preview is photorealistic. AI segments your brow or lash area at the pixel level, then generates an image that shows the style applied naturally to your features.
- Free, no account needed. You can try up to 10 styles per day.
The Six Styles You Can Preview
The visualizer covers three brow treatments and three lash styles. Here's what each one produces and who it works best for:
Brow Styles
Brow Sculpting Clean, defined arches with sharp, precise edges. This is the look you get from expert threading — your natural brow hair, shaped to perfection. If your brows have good density but lack structure, this preview shows what definition does for your face.
Brow Lamination Fluffy, brushed-up brows with a feathery texture. Lamination lifts and sets your existing hair upward, creating the appearance of thicker, fuller brows. The preview is especially useful if you're unsure whether the brushed-up look suits your face shape. For a deep dive on the treatment itself, read our guide on what brow lamination is and how it works.
Henna Brows Rich, filled-in color with depth and definition. Henna tints both the hair and the skin underneath, giving that "I already did my brows" effect. The preview shows you the difference between your natural brows and the bold, stained finish henna delivers. If you're deciding between henna and regular tinting, our henna brows guide breaks down the differences.
Lash Styles
Classic Lashes One extension per natural lash. The result is longer, defined lashes that look enhanced but not dramatic. If you've never tried lash extensions, the classic preview is the best place to start — it shows you how much impact a subtle set can have. Our lash extensions beginner's guide covers everything about your first appointment.
Volume Lashes Multiple lightweight extensions fanned onto each natural lash. The result is full, dense, glamorous. Volume can range from natural-full to dramatic depending on the fan width. The preview helps you gauge whether the density is right for your eye shape and daily style.
Hybrid Lashes A mix of classic and volume techniques — textured, dimensional, with variation in length and fullness across the lash line. Hybrid gives you depth without the uniformity of full volume. If you're torn between classic and volume, the preview settles the question. Our comparison guide goes into the technical differences.
How to Use the Visualizer
The whole process takes about 60 to 90 seconds. Here's the walkthrough:
1. Upload Your Photo
Head to the AI Visualizer and upload a selfie — or drag and drop one into the upload area. The tool accepts JPG, PNG, and WebP images up to 10MB.
Before anything else, the tool validates your photo automatically. It checks for:
- Resolution — your image needs to be at least 480 x 480 pixels
- Face detection — it needs to find exactly one face in the photo
- Distance — your face needs to take up enough of the frame (not too far away)
- Angle — you need to be facing the camera fairly directly, not turned to one side
If something's off, you'll get a specific message telling you what to fix. This validation runs in your browser using Google's MediaPipe FaceDetector — your photo isn't uploaded anywhere at this point.
2. Pick a Style
Once your photo passes validation, you'll see two categories: Brows and Lashes. Tap one to filter the available styles, then select the specific look you want to preview.
Each style card includes a name and brief description so you know what you're choosing before the AI runs.
3. Generate Your Preview
Hit the generate button and the tool goes to work. You'll see a three-step progress indicator:
- Analyze — The AI identifies and segments the precise region of your brows or lash area. This uses a segmentation model that detects your features at the pixel level, and you'll see the detected area highlighted on your photo as a mask overlay.
- Detect — The mask is finalized and prepped for generation.
- Generate — A generative AI model creates a photorealistic version of your photo with the selected style applied to the detected area.
This takes 30 to 60 seconds depending on server load. You can cancel at any point.
4. Compare and Decide
Your result loads into an interactive before-and-after slider. Drag the handle left and right to compare your original photo with the generated preview. The transition is seamless — same lighting, same angle, same face — so you can focus entirely on how the style changes your look.
From here you can:
- Save the preview image to your device
- Share the before-and-after with friends, your stylist, or on social media
- Try another style without re-uploading your photo
- Book this look if you're ready to commit
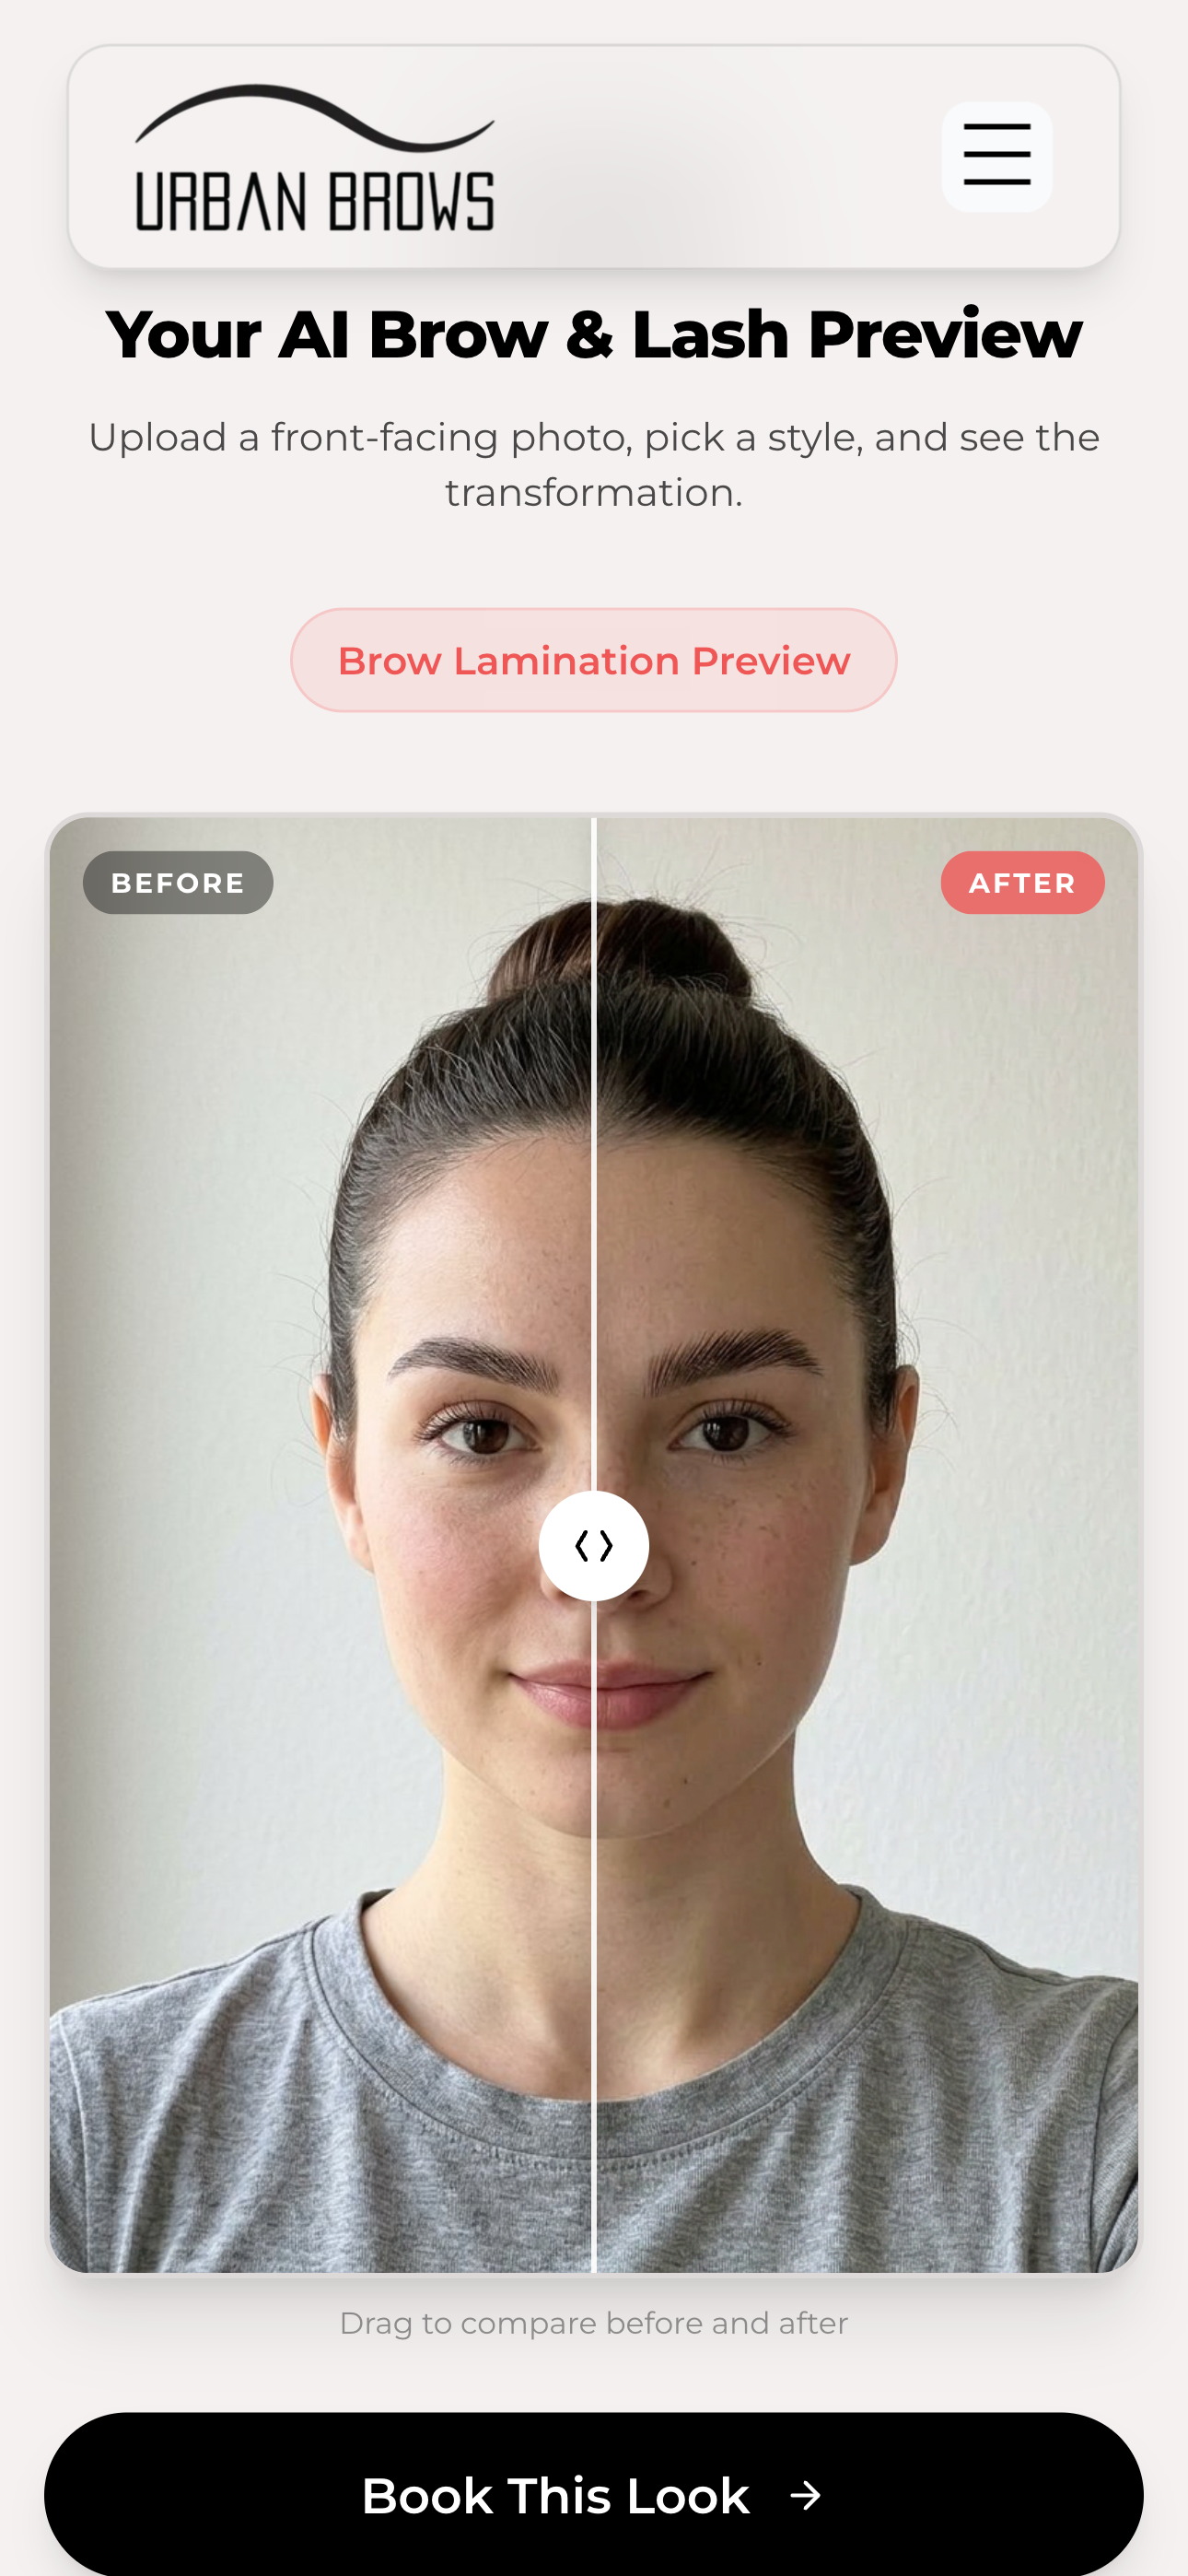
Smart Caching: Try Multiple Styles Faster
Here's a detail worth knowing: the tool caches your photo data between style selections within the same category.
If you preview brow sculpting and then switch to brow lamination, the AI doesn't need to re-segment your brow area — it already mapped it. Only the generation step runs again, which saves time. The same applies across lash styles.
If you switch from a brow style to a lash style (or vice versa), the segmentation does run again because it's targeting a different facial region.
The result: previewing your second and third styles in the same category is noticeably faster than the first.
What the Previews Can and Cannot Tell You
We want to be clear about this, because misleading people doesn't help anyone.
What the previews do well:
- Show you the general shape, density, and style direction of a treatment on your specific face
- Help you narrow down which style appeals to you before your appointment
- Give you and your artist a shared reference point for consultation
- Let you compare options side by side on the same face — yours
What the previews don't capture:
- The texture and dimension of real brow or lash hair. Generated images approximate this, but thread-by-thread detail varies from reality.
- How your skin tone reacts to specific tints or henna shades. Color is approximate.
- The feel and weight of lash extensions, which matters for comfort and daily wear.
- Individual hair growth patterns, density limitations, or asymmetries that your artist will assess in person.
The visualizer is a compass, not a contract. It points you in the right direction. Your artist fills in the rest.
Tips for the Best Results
Your preview is only as good as the photo you start with. Here's how to get the most out of the tool:
- Use natural lighting. Window light, daylight, or soft room lighting. Harsh overhead light or flash creates shadows that throw off the segmentation.
- Face the camera straight on. The validator checks for this, but even mild angles can affect how the generated style maps to your features.
- Pull your hair back. If hair falls over your brows, the AI may struggle to segment them cleanly. Same goes for bangs.
- Skip heavy eye makeup. Especially for lash previews — thick mascara or liner can blur the boundary the AI needs to detect.
- Use a recent photo. If you've tweaked your brows since the photo was taken, the preview will be working with outdated information.
- Try the same style twice if the first result feels off. Generative AI produces slightly different outputs each time. A second run with the same photo and style may capture the look more accurately.
From Preview to Appointment
If a preview convinces you, here's how to use it:
- Save the image. Download your favorite result so you have it on your phone.
- Book your appointment. You can book online at any of our Edmonton locations.
- Show your artist. At your consultation, pull up the preview. It gives your artist immediate context — what style you're drawn to, what level of drama you're comfortable with, and what you've already explored. That conversation starts with shared understanding rather than guesswork.
- Let your artist refine. Your artist will assess your natural hair, skin, and features, then adjust the style to work with what you have. The preview is your starting point. Their expertise is the finish line.
Privacy
- Your photo is uploaded to generate the preview, because the AI models that create it run on cloud servers, not in your browser.
- Your image is not stored, shared, or used for any other purpose. It's used to produce your result and that's it.
- No account needed. No email, no login, no profile.
- You can try up to 10 styles per day. This limit is per device to prevent abuse — it's not a paywall.
Frequently Asked Questions
How long does each preview take? About 30 to 60 seconds from clicking generate to seeing the result. Trying a second style in the same category (brow or lash) is faster because the segmentation step is cached.
Can I use a photo from my camera roll or do I need to take a new one? Either works, as long as the photo meets the requirements — at least 480 x 480 pixels, one face, front-facing, well-lit. Recent photos work best because they reflect your current brow and lash state.
Why did the tool reject my photo? The most common reasons: your face is too far from the camera, the photo is too low resolution, you're not facing the camera directly enough, or there's more than one person in the frame. The error message tells you which issue to fix.
Is this the same as an Instagram or Snapchat filter? No. Filters overlay pre-made graphics on your face — same brow shape for everyone, no awareness of your actual features. The visualizer uses AI segmentation to identify your specific brow or lash area, then generates a unique image based on the treatment style and your face. The output is photorealistic, not a graphic overlay.
Will my appointment results look exactly like the preview? Not pixel-for-pixel. The preview gives you the direction — the shape, density, and style — but real treatments work with your natural hair, skin, and growth patterns in ways that AI can approximate but not perfectly predict. Most clients find the preview is a strong indicator of the general outcome.
Can I use this on my phone? Yes. The visualizer is fully responsive and works on any device with a modern browser. Most people use it on their phones, and it was designed with mobile use in mind.
What styles will be added next? We're actively working on expanding the visualizer to include additional brow and lash styles. If there's a specific treatment you'd like to preview, let us know at your next appointment or through our contact page.
I love my preview. How do I book? Book online here. You can also bring your preview to any of our Edmonton locations as a walk-in — but booking guarantees your spot.